Tuesday, 31 January 2012

AddThis Social Bookmarking Tool Bar For Blogger

Now that almost all custom templates have removed the Blogger Navbar lots of Bloggers are adding different Toolbars to their blogs.In this post i will show you how to add the New Share Bar from AddThis Labs.The AddThis Share Bar is a Social Bookmarking tool bar that's compact and transparent so it wont disturb readers and can be added to your blog in seconds.The Share Bar also has a search that will automatically connect to your blog.The search and share options have a tool tip style hover titles and the Share bar can be closed with a click.The bar has buttons for Facebook, Twitter, Digg, Email, Bookmark and more with the option to open and share your blog posts on every social website imaginable.

Live Demo - Check out the AddThis Share Bar Here

social bookmarking share bar for blogger

AddThis Share Bar For Blogger

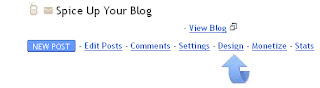
Step 1. In Your Blogger Dashboard Page Click 'Design' > 'Add A Gadget' > Choose Html/Javascript from the pop up menu.

Step 2. Copy The following code and paste it into the Html/Javascript Gadget :

<a href='http://www.spiceupyourblog.com'><img alt='Best Blogger Tips' src='https://blogger.googleusercontent.com/img/b/R29vZ2xl/AVvXsEgHxFa3i4E0aJmZLvYGSW2rFbNX53Ccdk-oGV1KDLd72XrllVj17ya6SZWNAoaM5HbtWdPvVV4CJO9IkimqtngwpaHfZuPDmBlEsNiJN73jKHh3Gi8pFkOdz0NHA6K-SmUD4_CIk71rXi6h/s1600/best+blogger+tips.png'/></a><script src="http://sharebar.addthiscdn.com/v1/sharebar.js" type="text/javascript"></script><a href="http://www.spiceupyourblog.com"/><small>Blogger Tips And Gadgets</small></a><div class="addthis_sharebar_config" style="display:none;">
</div>

Step 3. Save The Gadget - The position of the gadget on your design page is not important so you can drag and drop it to the bottom of your sidebar or into your footer.

Simple ! You Should check out more of our Blog Gadgets and Social Bookmarking Gadgets.Drop a comment to let us know what you think of the AddThis Share Bar

Blogger Stylish Hover Effect Thumbnails Only Related Posts

Back in December i published a post showing you a great Related Posts with thumbnails gadget.That gadget displayed a selected number of related posts generated using labels, the posts are displayed using a thumbnail with the title of the post below.That post has been one of the most popular on Spice Up Your Blog over the last few months and today i have another Related Posts With Thumbnails Gadget but with a very cool feature.

I found this gadget in a template i published on my Templates BlogBestBloggerTemplates.Net and knew it would be popular.This Related Posts gadget does not display the title of the post below the Thumbnail but rather has a Hover Effect to display the post title.So below your posts will be just the thumbnails but when you hover your cursor over them the thumbnail is replaced by the title.

Hmmm not easy to explain in text so take a look at the screenshots and live demo below.


Screenshot - Normal :


Screenshot Hover - You can see the title displayed when the cursor is hovered :


Live Demo - I'm using this gadget on my Social Icon Site (Scroll To End Of Any Post)

Add Related Posts Gadget To Your Blog


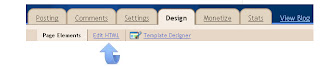
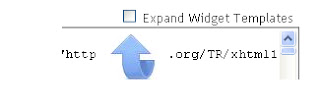
Step 1. In your Blogger dashboard click Design > Edit Html > Tick the Expand Widget templates box.


Step 2. Find the following piece of code in your blogs Html : (Click Ctrl and F for a search bar to help find the code - More Info)

]]></b:skin>

Step 3. Copy and paste the following code Directly Above / Before ]]></b:skin>

<!--start related posts css Info : http://www.spiceupyourblog.com-->

ul#related-posts{
font-family:"Droid Sans",Helvetica,Arial,sans-serif;
font-size:10px;
list-style: none;
margin: 20px 0;
padding: 0;
text-transform: none;
}
ul#related-posts li{
float: left;
height: auto;
margin:0 5px;
padding: 2px 1px 2px;
list-style-type:none;
}
*html ul.rp#related-posts li{
margin:0 13px;
}
ul#related-posts li a {
-moz-box-shadow: 0 1px 2px rgba(0, 0, 0, 0.15);
border: 2px solid #FFFFFF;
display: block;
height: 72px;
position: relative;
width: 72px;
}
ul#related-posts li a {
color: #474C51;
text-decoration: none;
text-shadow: 0 1px 0 #FFFFFF;
}
ul#related-posts li .overlay {
height: 66px;
line-height: 16px;
padding:6px 0 0 6px;
position: absolute;
width: 66px;
z-index: 10;
}
ul#related-posts li .overlay {
}
ul#related-posts li a:hover .overlay {
background: #fff;
display: block !important;
opacity:0.9;
}
ul#related-posts li img {
bottom: 0;
padding:0px !important;
}
ul#related-posts li a:hover {
-moz-box-shadow: 0 1px 3px rgba(0, 0, 0, 0.25);
}

<!--end related posts css.Info : http://www.spiceupyourblog.com-->

Step 4. Find the following piece of code in your blogs Html : (Click Ctrl and F for a search bar to help find the code - More Info)

<div class='post-footer'>

Step 5. Copy and paste the following code Directly Below / Under <div class='post-footer'>

<!--start related posts code Info : http://www.spiceupyourblog.com-->
<b:if cond='data:blog.pageType == &quot;item&quot;'>
<h3>Related Posts</h3>
<script type='text/javascript'>
var defaultnoimage=&quot;https://blogger.googleusercontent.com/img/b/R29vZ2xl/AVvXsEi4nswDcrjRYCPx2XV-vmzIdrDDOTl8zFScv2YNRdfAaCF-kmsNWxaboyqIc1uVAREfdqAmSQQpAX_CSt8gN2rLzoWfR3Sz75wvdO5zMh5rwAslGJhb4LD_jYbEHw13HSqyIt_Nf1Gjsnw/s1600/no-image.gif&quot;;
var maxresults=6;
</script>
<script src='http://suyb.googlecode.com/files/rph.js' type='text/javascript'/>
<b:loop values='data:post.labels' var='label'>
<b:if cond='data:label.isLast != &quot;true&quot;'>
</b:if>
<script expr:src='&quot;/feeds/posts/default/-/&quot; + data:label.name + &quot;?alt=json-in-script&amp;callback=related_results_labels_thumbs&amp;max-results=6&quot;' type='text/javascript'/>
</b:loop>

<script type='text/javascript'>
removeRelatedDuplicates_thumbs();
printRelatedLabels_thumbs(&quot;<data:post.url/>&quot;);
</script>
</b:if>
<div style='clear:both'/>
<br/><br/>
<a href='http://www.spiceupyourblog.com'><img alt='Best Blogger Tips' src='https://blogger.googleusercontent.com/img/b/R29vZ2xl/AVvXsEgHxFa3i4E0aJmZLvYGSW2rFbNX53Ccdk-oGV1KDLd72XrllVj17ya6SZWNAoaM5HbtWdPvVV4CJO9IkimqtngwpaHfZuPDmBlEsNiJN73jKHh3Gi8pFkOdz0NHA6K-SmUD4_CIk71rXi6h/s1600/best+blogger+tips.png'/></a>
<!--end related posts code Info : http://www.spiceupyourblog.com-->

Optional Changes

-You can change the title above the gadget from Related Posts (In Blue Above).

-You can change the number of posts displayed from 6 (In Red Above)

-The Gadget is set to only display on the post pages, if you want it displayd on the home page also remove the code highlighted in Green above. 

Step 6. Save your template.

Check out more of our Blog Gadgets and Featured Posts.

That's your Hover Effect Related Posts With Thumbnails, i would like to give credit toBloggerPlugins for the original script and BloggerzBible created the template in which i found the gadget along with making some changes to the original

A Cool Any Size JQuery Powered Featured Posts Slider For Blogger

Over the last few weeks i have published some cool jQuery Gadgets and Widgets for your Blogs.In this post i have taken the jQuery Easy Slider, a stylish slide show with some neat options and turned it into a kinda mini slider with the option to go large.We previously published the Blogger jQuery Anything Slider that had the option to add videos or images as slides and a Simple But Stylish Blogger Featured Posts Slider.So i wanted to continue with a slide show that could be easily re sized from spanning the width of your blog to the miniature example i have here.

This jQuery Featured Posts Slider also has features like auto scroll, continues scroll plus next slide and previous slide buttons for manual scroll.The original Easy Slider script and code was created by the very cool Css Globe, below is a live demo of our version. 

View Demo Button

As you can see i have gone small in the demo but it could be even smaller and of course much much bigger.

Add The Any Size jQuery Slider To Blogger


Remember Always Back Up Your Template Before You Make Changes - How To Back Up A Blogger Template

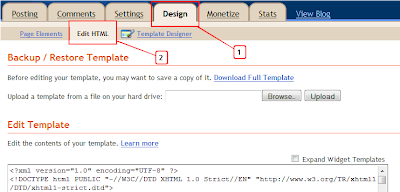
Step 1. In Your Blogger Dashboard Click Design > Edit Html

Design Edit Html Blogger

Step 2. Find the following piece of code in your blogs Html : (Click Ctrl and F for a search bar to help find the code - How To Find Code In A Blogger Template)

]]></b:skin>

Step 3. Copy and Paste the following code Directly Above / Before ]]></b:skin>

/*Slider Css*/
#slider{} 
#slider ul, #slider li{
margin:0;
padding:0;
list-style:none;
}
#slider li{ 
width:320px;
height:111px;
overflow:hidden; 

#prevBtn, #nextBtn{ 
display:block;
width:30px;
height:77px;
position:absolute;
left:-30px;
top:15px;

#nextBtn{ 
left:320px;

#prevBtn a, #nextBtn a{ 
display:block;
width:30px;
height:77px;
background:url(https://blogger.googleusercontent.com/img/b/R29vZ2xl/AVvXsEiOXszRqR9mekYGR68MWxKi5z8POPrfD8YzyGlojow2TF_mPFBfyFPrhXh_CpcWvOy8YAchAFx1hjUmtCbU-SMbcCgN3cxBlhWngpmdZAAUKOrONmrIyjFCiAChNqpBrLN7JQDS_Usl_j4/s1600/btn_prev.gif) no-repeat 0 0; 

#nextBtn a{ 
background:url(https://blogger.googleusercontent.com/img/b/R29vZ2xl/AVvXsEiQ1_rEB14n7ShC_WYrZ4o-EIm-iDmRZvqCU8gOPF6sPUkPthCEqPInEolEabu3cQxnOFu3zGF3bMTxSXekDZwndJd2BxEYquXsJ7mGwW5m5MoYBCfKGZTb9JEFBdkDTOtCi3kMEPIwp28/s1600/btn_next.gif) no-repeat 0 0; 

/*Slider Css Info @ http://www.spiceupyourblog.com*/


Change the size of the slider - The width and height are highlighted in yellow so you change these to your required dimensions.You will also have to change the position of the next and previous buttons which is a little more tricky.

Highlighted in red you can see i have the buttons 15px from the top, if you made the slider bigger you would increase the margin from the top.So for example if you made the slider 222px high you would make this 30px.You can try a few margins until you get it right.

Step 4. Find the following piece of code in your blogs Html : (Click Ctrl and F for a search bar to help find the code - How To Find Code In A Blogger Template)

</head>

Step 5. Now Copy And Paste This Code Directly Above / Before </head>

Note - If you have previously added jQuery to your template you can leave out the section in green.
<script src='https://ajax.googleapis.com/ajax/libs/jquery/1.6.1/jquery.min.js' type='text/javascript'/>
<script src='http://suyb.googlecode.com/files/easySlider1.7.js-blogger.js'/>
<script>
$(document).ready(function(){ 
$(&quot;#slider&quot;).easySlider({
auto: true,
continuous: true 
});
});
</script>

That's the Css and Script added for the slider now we add the Html for the actual images.

The Html, Links And Images


This is the html for the actual slider in the demo blog, you can see the links and images highlighted.You can copy and paste this code into a Html / Javascript gadget from your design page, add your links then save and drag and drop into position.

<div id="slider"> <ul> 

<li><a href="http://www.spiceupyourblog.com"><img src="https://blogger.googleusercontent.com/img/b/R29vZ2xl/AVvXsEiafPpmq5TDx8wrTPKT3gKqzoPbRhlozs4WQYbyPN6uRaZ4jfKIR_RsJe9iQWQTHR7wLKd4EQRcdtJxEZBDZwdmjWuHQOlqEUUSsmJdHG2g5-pDg7pP3C-qtxo7lpy_-AUrfSe0iBJATT8/s320/01.jpg" width="320px" height="111px" /></a></li>

<li><a href="http://www.bestbloggertemplates.net"><img src="https://blogger.googleusercontent.com/img/b/R29vZ2xl/AVvXsEivsP9VGlYHUDWXAGzOnNFuzW9UEWg2dhJqgw5ZF-FZkNqO1xSnA-wVasOvMkZxU_DJl5OXxjuGTVK9IMYScPWSxQOWdAmXEEi-AjzW0A-5uTG8JMTFCqTLvshKlVh451H7WSI5Z1FngKk/s320/02.jpg" width="320px" height="111px"/></a></li>

<li><a href="http://www.socialiconstudio.com"><img src="https://blogger.googleusercontent.com/img/b/R29vZ2xl/AVvXsEijDuFwSyNUKRCSabJFTImU732OcJMkE9h8X00F1_n4idoT-qZAG_RYWYkU-4CEmh9TpbMy9wb3NTg1YK7_WvPwrQryPAJcyUNV8gnQDLxcvqHdSyOQJcbWMKuUSMU6Dn1WT-sPG4wy_tc/s320/03.jpg" width="320px" height="111px" /></a></li>

<li><a href="http://www.spiceupyourblog.com"><img src="https://blogger.googleusercontent.com/img/b/R29vZ2xl/AVvXsEg_VuQDCrg0hJlR16razlqa7ULC9j5Abfwu4sxTDVGyWcXcZP9HC-9W39eAQ0apc-ClZ6xITeWcVuIlKOAV1smPIZt65DDtpEBKDKATLXT7mBXdFd-cO7o7jd0BwOKUdN1W42qTT172i70/s320/04.jpg" width="320px" height="111px" /></a></li>

<li><a href="http://www.bestbloggertemplates.net"><img src="https://blogger.googleusercontent.com/img/b/R29vZ2xl/AVvXsEjekz3lNFTOvHTk1dd1dPoxqb2Zm7SiMz1BeyUS2ZM5iI9fg5XoGa7Dqs88a-fvtjX3Jp4F3W4O-oHRkSXaVtDjcfp6dr3ltluBkrxN9Z51aKDTF3vpN4JcbBx1_w0uJHBgib1Zlit3NSs/s320/05.jpg" width="320px" height="111px" /></a></li>

</ul>
</div>
Note - The links are in yellow and the image URLs in red, change these to your links and images.

Note 1 - If you do change the size of the slider you need to change the width and height in each slide above to the same dimensions.

Add More Slides - To add more slides you simply add another link and image like this after the <ul> tag above :

<li><a href="http://www.bestbloggertemplates.net"><img src="https://blogger.googleusercontent.com/img/b/R29vZ2xl/AVvXsEjekz3lNFTOvHTk1dd1dPoxqb2Zm7SiMz1BeyUS2ZM5iI9fg5XoGa7Dqs88a-fvtjX3Jp4F3W4O-oHRkSXaVtDjcfp6dr3ltluBkrxN9Z51aKDTF3vpN4JcbBx1_w0uJHBgib1Zlit3NSs/s320/05.jpg" width="320px" height="111px" /></a></li>

That's it for the versatile jQuery Easy Slider and this Blogger Tip.Once again thanks to Css Globe, and make sure to check out more of our jQuery Gadgets and Blogger Gadgets

Add Four Columns To The Footer Section At The Bottom Of Your Blog

Almost all the new blogger templates have three or four columns in the footer section.It's a great place to add more content to your blog.You can see in my footer section i have made full use of the 3 sections i use.You can add things like your hit counters, about me, links, ads whatever you like.

To see what are we changing take a look at my demo's blog for an example using the minima template : Click Here and scroll to the bottom of the page.You will see the footer has changed from one column to four column and i have put some random widgets in place.

Once you make the change your layout will also change so you can easily add and remove gadgets like in the images below :

Take a look at the before and after images below :

Before :


After :


Lets add 4 columns to your blog 

Step 1. In your dashboard click ►►'Layou't ►►'Edit Html'

Find the following piece of code in your template :

(Click CTRL and F for a search bar to find code)
<b:section class='footer' id='footer'/>


Step 2. Replace the code you found with this code :

<div id='footer-column-container'>
<div id='footer1' style='width: 225px; float: left; margin:0; '>
<b:section class='footer-column' id='footer-column-1' preferred='yes' style='float:left;'>
<b:widget id='Text1' locked='false' title='Spice Up Your Blog 4 COLUMN' type='Text'/>

</b:section>
</div>
<div id='footer2' style='width: 225px; float: left; margin:0; '>
<b:section class='footer-column' id='footer-column-2' preferred='yes' style='float:left;'>
<b:widget id='Text4' locked='false' title='Spice Up Your Blog 4 COLUMN' type='Text'/>
</b:section>
</div>

<div id='footer3' style='width: 225px; float: right; margin:0; '>
<b:section class='footer-column' id='footer-column-3' preferred='yes' style='float:right;'>
<b:widget id='Text3' locked='false' title='Spice Up Your Blog 4 COLUMN' type='Text'/>
</b:section>
</div>

<div id='footer4' style='width: 225px; float: right; margin:0; '>
<b:section class='footer-column' id='footer-column-4' preferred='yes' style='float:right;'>
<b:widget id='Text2' locked='false' title='Spice Up Your Blog 4 COLUMN' type='Text'/>
</b:section>
</div>
<div style='clear:both;'/>
</div>


Step 3. Find this piece of code in your template :

]]></b:skin>


Step 4. Add this code Directly above or before ]]></b:skin>

#footer-column-container { border: .3px dotted #cccccc;}

.footer-column { margin: 0 10px 0 10px; padding:5px;
color: #666666; line-height: 1.5em; font-size:12px;}

.footer-column h2 {
padding-bottom:.15em; text-align:center;
font:"normal normal 80% 'Comic Sans MS','Lucida Sans Unicode','Trebuchet MS',Sans-serif";
color:#333333;
line-height:1em; letter-spacing:.1em;
border-bottom: 1px solid #cccccc;}

.footer-column ul { list-style:none; margin:0 0 0; padding:0 0 0;}

.footer-column ul li {
background: url(https://blogger.googleusercontent.com/img/b/R29vZ2xl/AVvXsEiK3YMbrdK-4zoeE9CiohUcYk4KzkSnTg6Anapa_14A9dDNKeRszwv1ns63kK3dFkRXDKaMFbOxwueL8PiwVeGJR3AFcgPbeTDiv5UiuwP4WTC5LOA3t8wy621FCSkh4PMUPCf8geSSKsDl/s320/bullet-1.gif) no-repeat;
margin:0 0 0; padding-left: 16px;
padding-bottom: 0.5em; line-height:1.2em;}

.footer-column .widget {margin:0 0 .5em; padding:0 0 1em;}

Remember you can get all these tips sent directly to your email and stay a step ahead.Its quick easy and of course a free service provided by Google just fill in the form below the post.

Now save your template.

The four columns are added to your blog.When you go to your layout you will see four gadgets are already added with the title 'Spice Up Your Blog 4 COLUMN' you just remove them and add the gadgets you want.