Wednesday, 1 February 2012

Blogger Stylish Hover Effect Thumbnails Only Related Posts

Back in December i published a post showing you a great Related Posts with thumbnails gadget.That gadget displayed a selected number of related posts generated using labels, the posts are displayed using a thumbnail with the title of the post below.That post has been one of the most popular on Spice Up Your Blog over the last few months and today i have another Related Posts With Thumbnails Gadget but with a very cool feature.

I found this gadget in a template i published on my Templates BlogBestBloggerTemplates.Net and knew it would be popular.This Related Posts gadget does not display the title of the post below the Thumbnail but rather has a Hover Effect to display the post title.So below your posts will be just the thumbnails but when you hover your cursor over them the thumbnail is replaced by the title.

Hmmm not easy to explain in text so take a look at the screenshots and live demo below.


Screenshot - Normal :


Screenshot Hover - You can see the title displayed when the cursor is hovered :


Live Demo - I'm using this gadget on my Social Icon Site (Scroll To End Of Any Post)

Add Related Posts Gadget To Your Blog


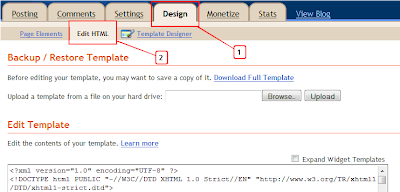
Step 1. In your Blogger dashboard click Design > Edit Html > Tick the Expand Widget templates box.


Step 2. Find the following piece of code in your blogs Html : (Click Ctrl and F for a search bar to help find the code - More Info)

]]></b:skin>

Step 3. Copy and paste the following code Directly Above / Before ]]></b:skin>

<!--start related posts css Info : http://www.spiceupyourblog.com-->

ul#related-posts{
font-family:"Droid Sans",Helvetica,Arial,sans-serif;
font-size:10px;
list-style: none;
margin: 20px 0;
padding: 0;
text-transform: none;
}
ul#related-posts li{
float: left;
height: auto;
margin:0 5px;
padding: 2px 1px 2px;
list-style-type:none;
}
*html ul.rp#related-posts li{
margin:0 13px;
}
ul#related-posts li a {
-moz-box-shadow: 0 1px 2px rgba(0, 0, 0, 0.15);
border: 2px solid #FFFFFF;
display: block;
height: 72px;
position: relative;
width: 72px;
}
ul#related-posts li a {
color: #474C51;
text-decoration: none;
text-shadow: 0 1px 0 #FFFFFF;
}
ul#related-posts li .overlay {
height: 66px;
line-height: 16px;
padding:6px 0 0 6px;
position: absolute;
width: 66px;
z-index: 10;
}
ul#related-posts li .overlay {
}
ul#related-posts li a:hover .overlay {
background: #fff;
display: block !important;
opacity:0.9;
}
ul#related-posts li img {
bottom: 0;
padding:0px !important;
}
ul#related-posts li a:hover {
-moz-box-shadow: 0 1px 3px rgba(0, 0, 0, 0.25);
}

<!--end related posts css.Info : http://www.spiceupyourblog.com-->

Step 4. Find the following piece of code in your blogs Html : (Click Ctrl and F for a search bar to help find the code - More Info)

<div class='post-footer'>

Step 5. Copy and paste the following code Directly Below / Under <div class='post-footer'>

<!--start related posts code Info : http://www.spiceupyourblog.com-->
<b:if cond='data:blog.pageType == &quot;item&quot;'>
<h3>Related Posts</h3>
<script type='text/javascript'>
var defaultnoimage=&quot;https://blogger.googleusercontent.com/img/b/R29vZ2xl/AVvXsEi4nswDcrjRYCPx2XV-vmzIdrDDOTl8zFScv2YNRdfAaCF-kmsNWxaboyqIc1uVAREfdqAmSQQpAX_CSt8gN2rLzoWfR3Sz75wvdO5zMh5rwAslGJhb4LD_jYbEHw13HSqyIt_Nf1Gjsnw/s1600/no-image.gif&quot;;
var maxresults=6;
</script>
<script src='http://suyb.googlecode.com/files/rph.js' type='text/javascript'/>
<b:loop values='data:post.labels' var='label'>
<b:if cond='data:label.isLast != &quot;true&quot;'>
</b:if>
<script expr:src='&quot;/feeds/posts/default/-/&quot; + data:label.name + &quot;?alt=json-in-script&amp;callback=related_results_labels_thumbs&amp;max-results=6&quot;' type='text/javascript'/>
</b:loop>

<script type='text/javascript'>
removeRelatedDuplicates_thumbs();
printRelatedLabels_thumbs(&quot;<data:post.url/>&quot;);
</script>
</b:if>
<div style='clear:both'/>
<br/><br/>
<a href='http://www.spiceupyourblog.com'><img alt='Best Blogger Tips' src='https://blogger.googleusercontent.com/img/b/R29vZ2xl/AVvXsEgHxFa3i4E0aJmZLvYGSW2rFbNX53Ccdk-oGV1KDLd72XrllVj17ya6SZWNAoaM5HbtWdPvVV4CJO9IkimqtngwpaHfZuPDmBlEsNiJN73jKHh3Gi8pFkOdz0NHA6K-SmUD4_CIk71rXi6h/s1600/best+blogger+tips.png'/></a>
<!--end related posts code Info : http://www.spiceupyourblog.com-->

Optional Changes

-You can change the title above the gadget from Related Posts (In Blue Above).

-You can change the number of posts displayed from 6 (In Red Above)

-The Gadget is set to only display on the post pages, if you want it displayd on the home page also remove the code highlighted in Green above. 

Step 6. Save your template.

Check out more of our Blog Gadgets and Featured Posts.

That's your Hover Effect Related Posts With Thumbnails, i would like to give credit toBloggerPlugins for the original script and BloggerzBible created the template in which i found the gadget along with making some changes to the original.

Use A Cool Envelope Background Image On Your Blogger Comments

In this post we are going to see how to add a really cool envelope image behind your Blog Comment Form.The envelope image will blend in with the comment form itself along with the Post A Comment Message, Post Comment and Preview Buttons and subscribe by email link.The image is grey with a nice design in the top left and a small icon will be below the subscribe by Email link users click to be notified of replies.

I always seem to be working on a million things and strangely enough i genuinely cant remember working on this.Last week as i was looking through a few test blogs (Must have over 100 now) i came across this on the comments section of one of them.I had even posted a test comment dated November 29 2010 so it was tested and ready to go and then i totally forgot about it ! Who knows what goes on in this head of mine or what great ideas lie hidden in long forgotten test blogs.


Screenshot

Background Image For Comment Form - Video Tutorial


The steps for this are explained i the video with the code needed and a summery of the steps below.


Code 1.

.comment-form {
background:#ffffff url(https://blogger.googleusercontent.com/img/b/R29vZ2xl/AVvXsEisSWHVLeQc2QdM6tdrZPhIzIzAW-ba_ARb3dd_Ic_9KZ2Up2gi5UqRuZVJvGVCvnrBQxREFGJhT1nuLUcDwOm3gU39SVWO9nG0j_Yj1cP5SXgyRg1mINdB-lrvswWnYPngvdMgmUocFrI/s1600/leave+reply+comment+background.jpg) no-repeat; 
padding: 100px 5px 0px 25px;
}

Code 2.

#comment-form {
background:#ffffff url(https://blogger.googleusercontent.com/img/b/R29vZ2xl/AVvXsEisSWHVLeQc2QdM6tdrZPhIzIzAW-ba_ARb3dd_Ic_9KZ2Up2gi5UqRuZVJvGVCvnrBQxREFGJhT1nuLUcDwOm3gU39SVWO9nG0j_Yj1cP5SXgyRg1mINdB-lrvswWnYPngvdMgmUocFrI/s1600/leave+reply+comment+background.jpg) no-repeat; 
padding: 100px 5px 0px 25px;
}

Summery

A. Click Design
B. Click Template Designer Link.
C. Click Advanced.
D. Scroll To Add Css.
E. Paste In Code And Click Apply To Blog.

Note - The width of your posts and comment form may make the image be out of line with the comment form.

And that's it you have a neat background image on your comment form.Check out more of ourComments Tutorials and Blogger Tips

Remove The White Space Gap Below Blogger Comment Form

A question i was asked this week was 'I notice a big empty gap below the comment form on my blog.There is a big space between the comment form and the older posts, home and newer posts links, is there a way to remove it ?'.The problem is in the size given to the iframe for the comment form and you can indeed remove the space by making the iframe smaller.We simply find the code for the comment form iframe and make a quick change, couldn't be easier.

How To Remove The Space Below Blogger Comment Form


Step 1. In your Blogger dashboard click > Design > Edit Html > Tick The Expand Widget Templates Box.

Step 2. Find the following piece of code in your blogs Html : (Click Ctrl and F for a search bar to help find the code - More Info)

<a expr:href='data:post.commentFormIframeSrc' id='comment-editor-src'/>

If you cant find this just look for iframe.

Step 3. The line of code you found with be followed by a section like this :

<a expr:href='data:post.commentFormIframeSrc' id='comment-editor-src'/>
<iframe allowtransparency='true' class='blogger-iframe-colorize blogger-comment-from-post' frameborder='0' height='410' id='comment-editor' name='comment-editor' src='' style='display: none' width='100%'/>
<b:else/>
<h4 id='comment-post-message'><data:postCommentMsg/></h4>
<p><data:blogCommentMessage/></p>
<data:blogTeamBlogMessage/>
<a expr:href='data:post.commentFormIframeSrc' id='comment-editor-src'/>
<iframe allowtransparency='true' class='blogger-iframe-colorize blogger-comment-from-post' frameborder='0' height='410' id='comment-editor' name='comment-editor' src='' width='100%'/>

The height i have highlighted sets the height of the iframe, as you can see it was 410 in the test blog i used for this post it could be different in your blog.Whatever the size in your blog we simply make it smaller (it will be there twice as above), i have found changing it to 260 does the trick but you can play around with it until your happy.

That's it, so simple and I'm sure many of you will also have been looking for the way to remove the space

The New Share This Bookmarking Buttons With Share Count For Blogger

Share This is a very popular service offering multiple Social Bookmarking Widgets for blogs and websites.The green Share This icon is a familiar sight on many of the top blogs opening up a wide range of options for readers to Bookmark and share the content.In this post i have a Blogger Tip show you how to add the new Share This 'Oath' Counter Buttons to various positions on your blog.You can see the buttons in question to the top of this paragraph and that position will be one of the options for your blog.

To generate the buttons you will need to go to the Share This website and use their very easy generator process.In the video below we will go through the steps from generating the buttons to adding them to your blog.Lets look at the demo on the test blog from the video.

View Demo Button

Add The New Share This Counter Buttons To Your Blog


Video Tutorial


Summery And Codes


Go To Share This and generate your buttons as shown in the video tutorial - Share This

Add The Share This Script


When you have chosen your buttons you will be presented with two snippets of code.The top snippet is for the actual buttons and we will need that later now we will add the second snippet of code to your template.This code only needs to be added once and will allow all the buttons to work.

Step 1. In your Blogger dashboard click Design > Edit Html

Step 2. Find the following piece of code in your blogs Html : (Click Ctrl and F for a search bar to help find the code - More Info)

</head>

Step 3. Copy and paste the second snippet of code from Share This directly above </head> then save your template.

That's the script added, how easy was that.

Add The Counter Buttons Buttons To Your Blog


So i will show you how to add the buttons to various positions on your blog.Namely horizontally above your posts (Below the post title), Vertically At the top of your posts wrapped in text and horizontally below your posts.You can also add them to a Html/Javascript gadget in your sidebar.

For all positions you need to go your your blogs html, that's Design > Edit Html > and tick the Expand widget templates box.

Horizontally Above Posts


Find This Code and paste the button code directly below it, save and that's it !

<div class='post-header-line-1'/>

Horizontally Below Posts


Find this code and paste the code below it, save and once again that's it !

<div class='post-footer'>

Wrapped In Text At The Top Left Or Right Of Posts


For this there is a little extra work, we need to set the buttons to sit on the left or right and we need them to be vertical.To do this i have added code to put them on the left, you will also need to add the line break tag between each button.

To add the line break you add <br/> between the code for each button.So in your button code after every instance of </span> you add <br/> to look like the example below :

<span class='st_twitter_hcount' displayText='Tweet'></span><br/><span class='st_facebook_hcount' displayText='Facebook'></span><br/><span class='st_friendfeed_hcount' displayText='FriendFeed'></span><br/><span class='st_blogger_hcount' displayText='Blogger'></span><br/><span class='st_sharethis_hcount' displayText='ShareThis'></span><br/>

First we find the position in your template for your buttons, once again we are clicking Design > Edit Html > And Tick The Expand Widget Templates Box.

Find the following code in your blogs Html :

<data:post.body/>

Next we add the following code directly Above <data:post.body/>

<div style="float: left; margin-right:5px;">


! Button Code Here !


</div>

-Replace ! Button Code Here ! with the code for your buttons.
-To have the buttons on the right change left and right to right and left.

Add A Neat 5 Column Category Label Section To Your Blogs Footer

A recent Email i received asked about two of my other blogs and how i had managed to place a list of labels across five columns in the footer.The two blogs in question are gallery's for Blogger Templates and Social Icons, as they are gallery's they both have a lot of labels or categories.Displaying all labels in the sidebar is not an option as it would take up too much room.So i have placed them listed alphabetically neatly in the footer across five columns.I then display some of the main labels in the sidebar with a link that jumps directly to the list in the footer for people to navigate.I find this a great use of space and in this Blogger Tip i will show you how i have done it.Below you can see some screenshots and i have the links to each site for you to see the section in action.

Blogger Tip Category Wrapper


I got the idea for this Blogger Tip from a post on Ipietoon via Myherro and simply made some changes to suit each template.So lets look at the two blogs in question so you can see how it works.Follow the links to each and scroll to the footer.Alternatively you can click 'Categories' in the sub menu on Social Icon Studio or 'All template Categories' on BestBloggerTemplates.Net to jump directly down.

Social Icon Studio

Best Blogger Templates

OK so lets add it to your blog looking at some of the options along the way.

Add 5 Column Category Label Wrapper Section To Blogger Footer


Step 1. We start this Blogger tip by going to your Blogger Dashboard and clicking Design > Edit Html 

Design Edit Html Blogger

Step 2. Find the following piece of code in your blogs Html : (Click Ctrl and F for a search bar to help find the code - More Info)

]]></b:skin>

Step 3. Copy and paste the following code Directly Above / Before ]]></b:skin>

/*Start Category Wrapper Css*/
#category-wrapper {
width:900px;
clear:both;
margin:0 auto 10px;
padding-top:15px;
line-height: 1.6em;
text-align:left;
border-bottom:0px solid #efefef;
}

.cat {
color: #000000;
line-height: 1.5em;
}

.cat ul {
list-style:none;
margin:0 0 0;
padding:0 0 0 8px;
}
.cat ul li {
float:left;
width:18%;
list-style-type: none;
margin: 0 0 5px;
padding-left: 12px;
background:url(https://blogger.googleusercontent.com/img/b/R29vZ2xl/AVvXsEgLCkWKOu28djsTEuIpqh7rCtU4JbNj-SJsSMMBLICG6FfTPKdaLNUNsdtKZb9QJO6hyphenhyphenO-iYgCb1daIlsJfT7qApZ8-7Vwlv9TTUGXDktDG2eNQfjShLBvG4J99ZSZxGq3IQKmJNkgaGyVe/s1600/bullet-suyb.gif) no-repeat left center;
}

.cat .widget {
border-bottom:0px dotted #ddd;
margin:0 .5em 1.5em .5em;
padding:0 0 1.5em;
}
/* End Category Wrapper Css Info @ http://www.spiceupyourblog.com */

Edits And Options

Width 900px; - Total with of all columns, You may need to change to suit the width of your blog.

width:18%; - Width in percentage of each column, We divided 100 by 5 and gave a little leg room so each column is 18% of the total width.If you increased this to say 23% you would then have 4 columns, 31% would leave you with 3 columns and so on.

In blue is the list bullet image beside each label and you can change it if you please.

Step 4. Find The Following Code In Your Blogs Html 

<div id='footer-wrapper'>

Step 5. Copy and Paste the following code directly Above / Before <div id='footer-wrapper'>

<div id='category-wrapper'>
<b:section class='cat' id='cat'>
<b:widget id='Label99' locked='false' title='Categories' type='Label'/>
</b:section>
</div>

Step 5. Save Your Template, the 5 column labels section should not be on your blog !

Linking Directly To The Labels Section


If you now wanted to link to this section as i have done on both blogs this is the link you would use, you can of course change the text 'All labels' :

<a href='#category-wrapper'>All Labels</a>

So in a way the address of the category wrapper is #category-wrapper and that's what you would add to a link in a menu bar or regular hyperlink.That's it for the category wrapper, make sure to check out more of our Blogger Tips.